A Calm Finish for a Hoop Display
A calm finish for a hoop display keeps embroidery centred, evenly tensioned and tidy at the back, with a clear sequence for preparing the piece.
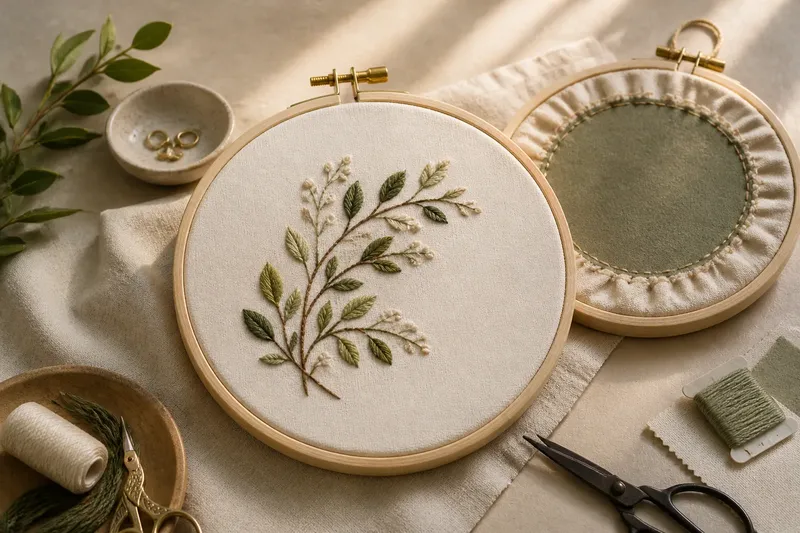
A calm finish for a hoop display starts with loosening the fabric before you centre it, not pulling harder on the screw. That small change helps the stitched area sit evenly in the hoop and gives you a better chance of making a tidy reverse without distorting the design.
Set up the hoop
Use the outer ring as the display frame and the inner ring as its support. Check that both are clean and free of splinters, dried glue or rough edges that could catch the fabric. A screw fitting should turn smoothly; a little resistance is normal, but do not force a stiff fitting.
Place the completed work on a clean, flat surface with the stitched side facing up. If the fabric has creases, let it rest first, then press it gently from the reverse on a suitable surface. Keep the iron away from raised stitches unless the thread and fabric care instructions allow direct contact. A pressing cloth gives extra protection.
Loosen the hoop until the inner ring can move without scraping the fabric. If the piece is already in the hoop, lift the outer ring away rather than dragging it across the stitches. Check the fabric grain: the warp and weft should run roughly parallel to the hoop’s sides, not sit noticeably skewed. This gives you a useful reference while centring.
Centre the design
Find the visual centre of the embroidery, which may not be the centre of its pattern boundary. A trailing stem, a cluster of flowers or an intentionally open area can make a mathematically centred motif look off-balance. Hold the hoop above the cloth and judge the whole composition, including blank space around the stitches.
For a simple check, fold the fabric loosely in half in each direction, using the stitched area as your guide, then open it again. Avoid making a sharp crease through the design. The folds indicate approximate centre lines; they are guides, not marks you need to force the motif to obey. You can also use a washable fabric marker on the reverse if the fabric is suitable and the mark can be removed safely.
Imagine you have stitched a small leafy branch that curves towards the right. If you centre its furthest leaves rather than the dense stem, the branch may appear crowded on one side. Shift the motif a little towards the open side, then check it from a distance. The expected result is a balanced-looking margin, even if the design’s geometric midpoint is not exactly in the hoop’s middle.
Seat the fabric evenly
Lay the inner ring beneath the fabric and lower the outer ring over it. Keep the design facing up and the screw near the top, unless the hoop’s shape or the composition suggests another orientation. Press the outer ring down gradually, checking that the fabric has not folded beneath its edge.
Once the rings meet, make only a light adjustment to the screw. Smooth the fabric outwards from the centre with your fingertips, working around the hoop in small turns. Pull opposite edges in sequence rather than tugging one side hard. This spreads the tension and helps keep the grain straight.
Look across the surface in raking light. The fabric should lie flat, with no diagonal ridges radiating from the design and no puckering around dense stitches. If a wrinkle appears, loosen the screw, lift the outer ring slightly and reposition the cloth. Do not try to erase a crease by hauling the fabric through a fully tightened hoop; that can stretch the ground fabric while leaving the stitches distorted.
Balance the tension
Display tension should hold the fabric smooth without making it drum-tight. Press lightly near the edge of the design: the cloth should feel supported, not strained. A tight hoop can pull the weave out of shape, alter the spacing between stitches and make the rim press hard against the embroidery.
Check the front from several angles before trimming anything. The design should remain centred when the hoop is held upright, and the outer ring should sit level rather than tilt because fabric has bunched under one side. If it shifts, loosen the screw and redistribute the cloth. Tightening the screw is not a substitute for correcting uneven fabric.
One thing not worth the effort is chasing identical tension at every point by repeatedly pulling the fabric edge. A small variation at the hidden margin is usually less distracting than a distorted motif. Aim for a smooth display surface and a relaxed, even fit.
Prepare the reverse
Turn the hoop over and inspect the back before covering it. Secure loose thread ends by weaving them beneath nearby stitches, without pulling them so firmly that the front puckers. Trim only the excess tail after it is secure. Remove lint and stray fibres with clean fingers or a soft brush.
For a clean edge, trim the fabric with a generous margin beyond the outer ring. Keep the scissors parallel to the hoop and cut gradually, turning the piece as you go. Leave enough cloth to fold comfortably towards the centre; cutting close to the rim can make the backing difficult to attach and may expose raw edges.
Fold the margin over the inner ring and gather it with small running stitches in strong sewing thread. Take shallow bites through the fabric, spacing them evenly around the circle. Pull the thread a little at a time as you work so the fabric gathers smoothly rather than forming a hard knot of pleats at one point. Tie off securely on the reverse, then tuck the thread end beneath the gathered edge.
If you prefer a covered back, cut a piece of felt or thin card slightly smaller than the inner ring and attach it over the gathered fabric with a few discreet stitches. Felt gives a soft finish; card creates a firmer cover but should not press against long stitch tails or bulky knots. A backing is optional: a neat gathered edge is enough for many displays.
Finish and hang safely
Wipe the hoop’s rim with a dry, soft cloth and check that no thread or fabric projects past the edge. Look at the embroidery from the front once more. If the display feels balanced and the fabric remains smooth, stop adjusting it; further tightening can do more harm than good.
Choose a hanging method that suits the hoop and its weight. A small screw eye or a hanging loop can be fitted to the frame if the material and maker’s instructions permit it. Keep any metal fitting away from the fabric, and use a wall hook that is secure for the intended location. If you are unsure how the hoop should be altered, follow the manufacturer’s guidance or ask a qualified professional rather than improvising a structural attachment.
Hoop display questions?
Should the screw sit at the top?
Usually, a top-facing screw gives the display a familiar orientation and makes the hoop easy to hang. Turn the hoop if another position balances the design better, but check that the fitting does not interfere with your hanging method.
Can I display the piece in the hoop I stitched in?
You can, provided the hoop is clean and the fabric is not stretched or marked by prolonged pressure. If the rim has left a crease, remove the fabric, let it relax and refit it before deciding whether the same hoop is suitable for display.
What if the fabric keeps slipping?
Check that the rings are clean and that the fabric margin is not caught in a fold. Refit the cloth with even tension, then make a modest screw adjustment; avoid adding glue directly to the fabric, as it can stain or stiffen the work.
Is a backing necessary?
No. A backing can conceal gathered fabric and loose tails, but a carefully finished reverse can be left visible. Choose based on how the piece will be viewed and whether the cover would press against the stitches.
A calm finish for a hoop display is mostly a matter of stopping at the right point: centre the composition by eye, smooth the cloth with small adjustments, and keep the reverse secure without crowding it. Before hanging, give the fabric edge and the fitting one last check so the finished piece looks composed from both sides.