The Loop That Makes a Chain Stitch
Learn how to make a chain stitch, control each loop and keep the linked line even without pulling the thread tight.
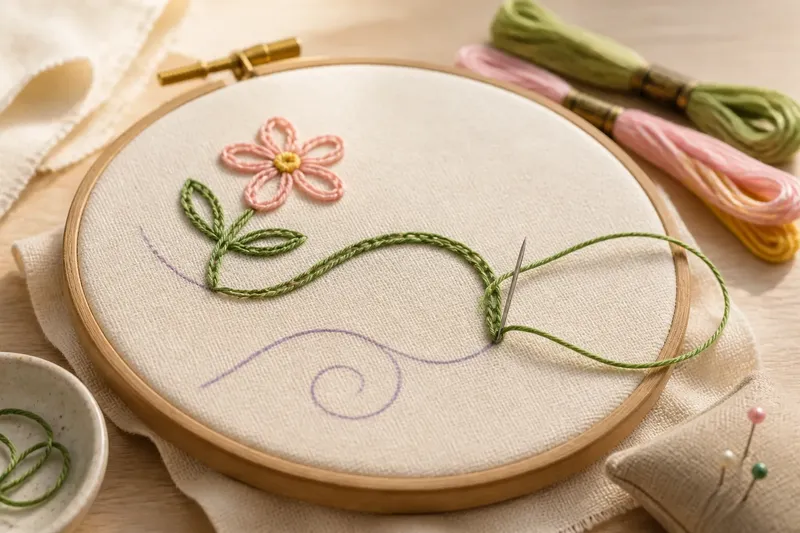
A chain stitch stays even when each loop is made with the same small movement and given room to lie flat. To make a chain stitch, bring the needle up at the start of the line, then take it down close to the same point while leaving a loop of thread on the surface. The next stitch catches that loop, linking the chain together.
How does a chain stitch work?
Each chain stitch is a loop secured by the following stitch. The needle passes down inside the loop and comes up a short distance ahead. When you draw the thread through, the first loop settles around the needle’s path. The next stitch repeats the action, catching the new loop before it can pull free.
Think of the needle as a temporary peg holding the loop in place. The thread should rest around its shaft, not cinch tightly against the fabric. Once the needle comes through, the loop can lie flat with its rounded end pointing back towards the previous stitch.
Work from one end of the line to the other without twisting the fabric or dragging the working thread across the surface. A chain can curve, but the loop direction should stay consistent: each new link emerges from the end of the one before it.
How do you make the first loop?
Bring the needle up at the start of the intended line. Put it back down very near that entry point, leaving a loop of working thread on the surface. Bring the needle up a little farther along the line, inside the loop, and pull it through gently. The thread now forms the first secured link.
Keep the first loop modest. If it sprawls across the fabric, the chain will begin with a loose, oversized link; if you draw it tight before taking the next stitch, it may collapse into a straight bar. A smooth, rounded loop is easier to repeat than one pulled taut.
For a clear starting point, mark the line lightly with a removable fabric marker or follow a printed pattern. Keep the first entry and exit points aligned with the path rather than adding a bulky knot at the surface. A small knot or thread tail on the reverse can secure the start, depending on your usual method.
Why keep the loops consistent?
Similar loop sizes create a steady visual rhythm. If one link is noticeably longer or wider than the next, the eye pauses at that change. Even links make a line read as a connected border or curve rather than a sequence of unrelated marks.
Consistency also helps the chain sit neatly on the fabric. Oversized loops can snag or lean to one side, while tight, tiny loops may crowd one another. Aim for a repeatable distance between each needle placement and a similar amount of slack in the loop, adjusting both to suit the line and the fabric.
Say you are stitching a curved stem on a small cotton motif and notice that the links are growing longer as the curve opens. Shorten the distance between needle placements and check the next few loops against the earlier ones. The expected visible result is a smoother-looking bend, with links that follow the curve without a sudden stretched section.
How do you keep tension even?
Let the working thread slide through the fabric, then stop pulling as soon as the loop settles. A useful cue is to watch the fabric around the stitch: if it puckers, the thread is too tight for that placement. Ease the loop with the needle tip before moving on rather than yanking the thread.
Keep your hand movements similar from stitch to stitch. Pulling sharply on one link and gently on the next changes the loop shape even if the needle spacing stays the same. If the thread catches or twists, pause and let the needle or thread untwist before continuing; twisted strands can make an otherwise regular chain look lumpy.
It is not worth measuring every stitch or trying to make a natural curve look mechanically identical. A small amount of variation gives hand embroidery its character. Focus on avoiding abrupt changes in size, not on forcing every loop into a perfect copy.
What should you do on curves?
Use shorter stitches around a tight curve and slightly longer ones along a broad, gentle sweep. The chain can then turn gradually instead of cutting across the inside of the bend. Keep the loop direction aligned with the curve, and check the line after every few links.
On a sharp turn, stop before the needle placements begin to crowd. Make the next link shorter, then continue around the bend. If the loops overlap or flare outward, unpick the last few stitches and try a closer spacing; correcting a short section is easier than disguising a kink later.
What do beginners ask?
Why does my chain stitch look like a straight line?
The loops may be pulled too tight, or the needle may be coming up outside the thread loop rather than inside it. Leave enough slack for a rounded link and bring the needle up through the loop each time.
Why do my loops twist or cross?
The thread may be twisted, or a loop may have been caught from the wrong direction. Pause to let the thread unwind, then keep each new link emerging from the end of the previous one.
How far apart should the needle placements be?
There is no single spacing for every fabric or design. Start with a short, manageable distance, then adjust until the loops lie flat without bunching or stretching; keep that spacing broadly steady along the same section.
Can I change direction with chain stitch?
Yes. Follow the marked line and turn gradually, shortening the links as the curve tightens. For a sudden corner, a small backstitch or a fresh starting point may give a cleaner turn than forcing a long loop around it.
How do you practise the rhythm?
Draw a few straight and curved lines on a fabric scrap held securely in an embroidery hoop. Work a short row of chain stitch, paying attention to three things: where the needle enters, where it comes up, and how much slack remains. Compare the links visually as you go, rather than stopping to measure each one.
If a loop differs sharply from its neighbours, pause and identify the cause. Was the needle distance longer? Did you pull harder? Did the thread twist? Change one habit on the next stitch, then continue. This makes practice specific and helps you recognise which part of the motion shapes your line.
For chain stitch, the main search question—how to make a chain stitch—comes down to a repeatable loop: enter near the last point, come up inside the thread, and draw it through gently. Keep the links close enough to connect, loose enough to round, and consistent enough to carry the line smoothly across the fabric.